
This post will tell you how to change the speed of Microsoft Word’s “Text-to-Speech” feature (which allows you to highlight text and have it dictated back to you). For authors, hearing their book read back to them is a great way of catching errors they have missed the first passes through (and we love error-free books to promote with our content-rated book deals). This article will not tell you how to put the Text-to-Speech button on your menu ribbon, but if that’s what you’re looking for, you can find our article about that here.
Note: Do not confuse the Text-to-Speech feature with the Read-Aloud feature. Text-to-Speech will read back a highlighted section, and you can make changes in the text without disrupting the reading. Read-Aloud will read one word at at time beginning where you put your cursor and does NOT allow a continuous reading while trying to edit because it will start again at the new place each time you move your cursor and attempt an edit.
Text-to-Speech
Microsoft Word uses text-to-speech functionality that is built into Windows. Any Windows application can use this, so it should come as no surprise that the text-to-speech settings are part of Windows Control Panel and not your Microsoft Word program.
For Windows 8 and older, the easiest way to get to these settings is by using Windows search.
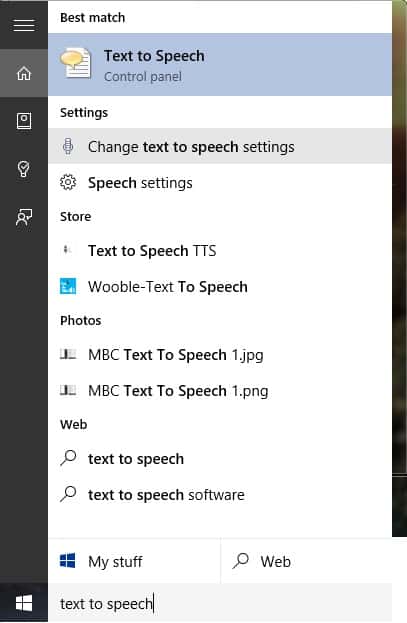
- If you are still in Windows 7 or older, click the Start button and type “text to speech” on the search box. Now click the “Change text to speech settings” line.

- If you are in Windows 8, there’s no need to push the Start/Window button to find the search box. Just type “text to speech” in the search box, then click the “Change text to speech settings” line.
- In Windows 10 there are two places with Text to Speech options, one in System Settings and the other in the Control Panel. WARNING: The one in System Settings has no impact on Microsoft Word’s “Speak” feature, but it is the one that shows up in the search. Don’t choose it. You must go to the Control Panel. To open the Control Panel, type “control panel” in the search box and click the top line.

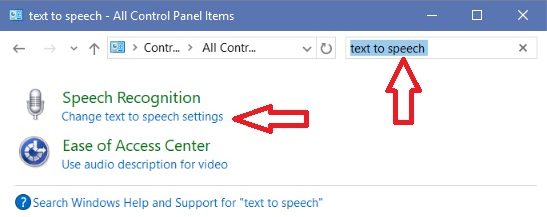
Now type “text to speech” in the search box found on the top right corner of the Control Panel, then click the “Change text to speech settings” line.
The Text to Speech settings window will look something like this.
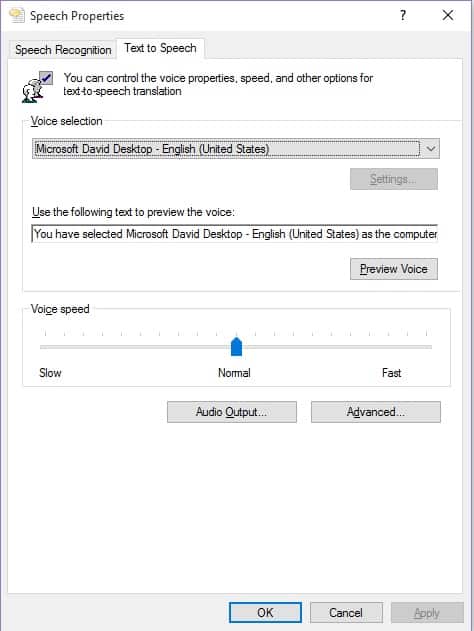
You see that “Voice speed” slider? Move it to the right to make it talk faster, and to the left to make it talk slower. Use the “Preview Voice” button above the slider to test the settings. Once you are satisfied with the results, push the OK button.
You may have more than one “voice” installed. My version of Windows 10 has a male voice (David) and a female voice (Zira). However, the Windows 7 computer I tried this on only had the male voice.
This post would not be complete without showing you how to get to the “Speak” feature in Word. It’s not on any of the ribbons and as far as I know it is not on the Quick Access toolbar either unless you take actions to put it there. We have a good article on how to do this here.
Comments and questions are welcome. And if you enjoyed this post, please share it using the buttons to the left.
If you’d like to learn more about Book Cave author promotions or other tips for authors, please enter your email below and click the “Learn More” button to receive our author newsletter.


this works!! i had to search all day (not really) to have a correct answer… i could not find one… only on day two (this was the first search) i got this… this is really correct although it has missed a few steps… that’s all
This was extremely helpful. Thank you.
Windows 10
Very rapidly this web page will be famous among all blogging and site-building viewers, due to it’s pleasant articles|
button a second time, it stops. Click the button again to continue from that point on. So, essentially, you have a Pause feature with Read Aloud that is not available with Speak.